Preparing The 4-Compartment Box
Since it had been raining continuously since last night and the humidity was very high this morning, I decided to postpone attaching the Aruki sliding panels for the special-order boxes. Instead, I started preparing the 4-compartment boxes that were also planned for production. I do not have formal drawings for this design, but I do have a memo with the box dimensions and various notes. Looking at it, I noticed that the last time I made this box was apparently in 2014. I honestly cannot remember whether I made any after that, but seeing those notes reminded me that this is quite a challenging box to build. To be honest, my memory of the details has become a little unclear, and I could not fully recall all the points that require special attention. Because of that, rather than using my usual production method, I decided it would be better to build it step by step, carefully fitting the parts together as I go.
This box contains four separate 5-step mechanisms, with the interior divided into four compartments. The mechanisms themselves are not especially difficult, but there are several important points to consider during construction. One of the main structural features is that only two compartments can be opened at a time. When two compartments on the same side are open, the other compartment must still be covered by a lid. This means that when one compartment is opened, the sliding lid panel must move just the right distance to cover the neighboring compartment. Because of this, the dimensions must be calculated very carefully. At the same time, that sliding panel also serves as the lid for one compartment, so it must never come out of the box. To prevent this, a small pin is installed. The pin allows the panel to function as a lid while also preventing it from being removed. The position of the pin must be calculated so that it stops against the opened side panel at exactly the right point. Unfortunately, none of these details were written in my notes. I suspect that I once had a sample box and simply copied the dimensions from it whenever I made another one. At the moment, however, I cannot find that sample. I had originally planned to change the dimensions slightly for this new batch, but I decided to stay as close as possible to the original size. The dimensions were probably carefully worked out for this design, so I felt it would be better not to change them without a good reason. I expected the work to go a little more smoothly, but it looks like I will need to proceed more carefully than I originally thought..haha.
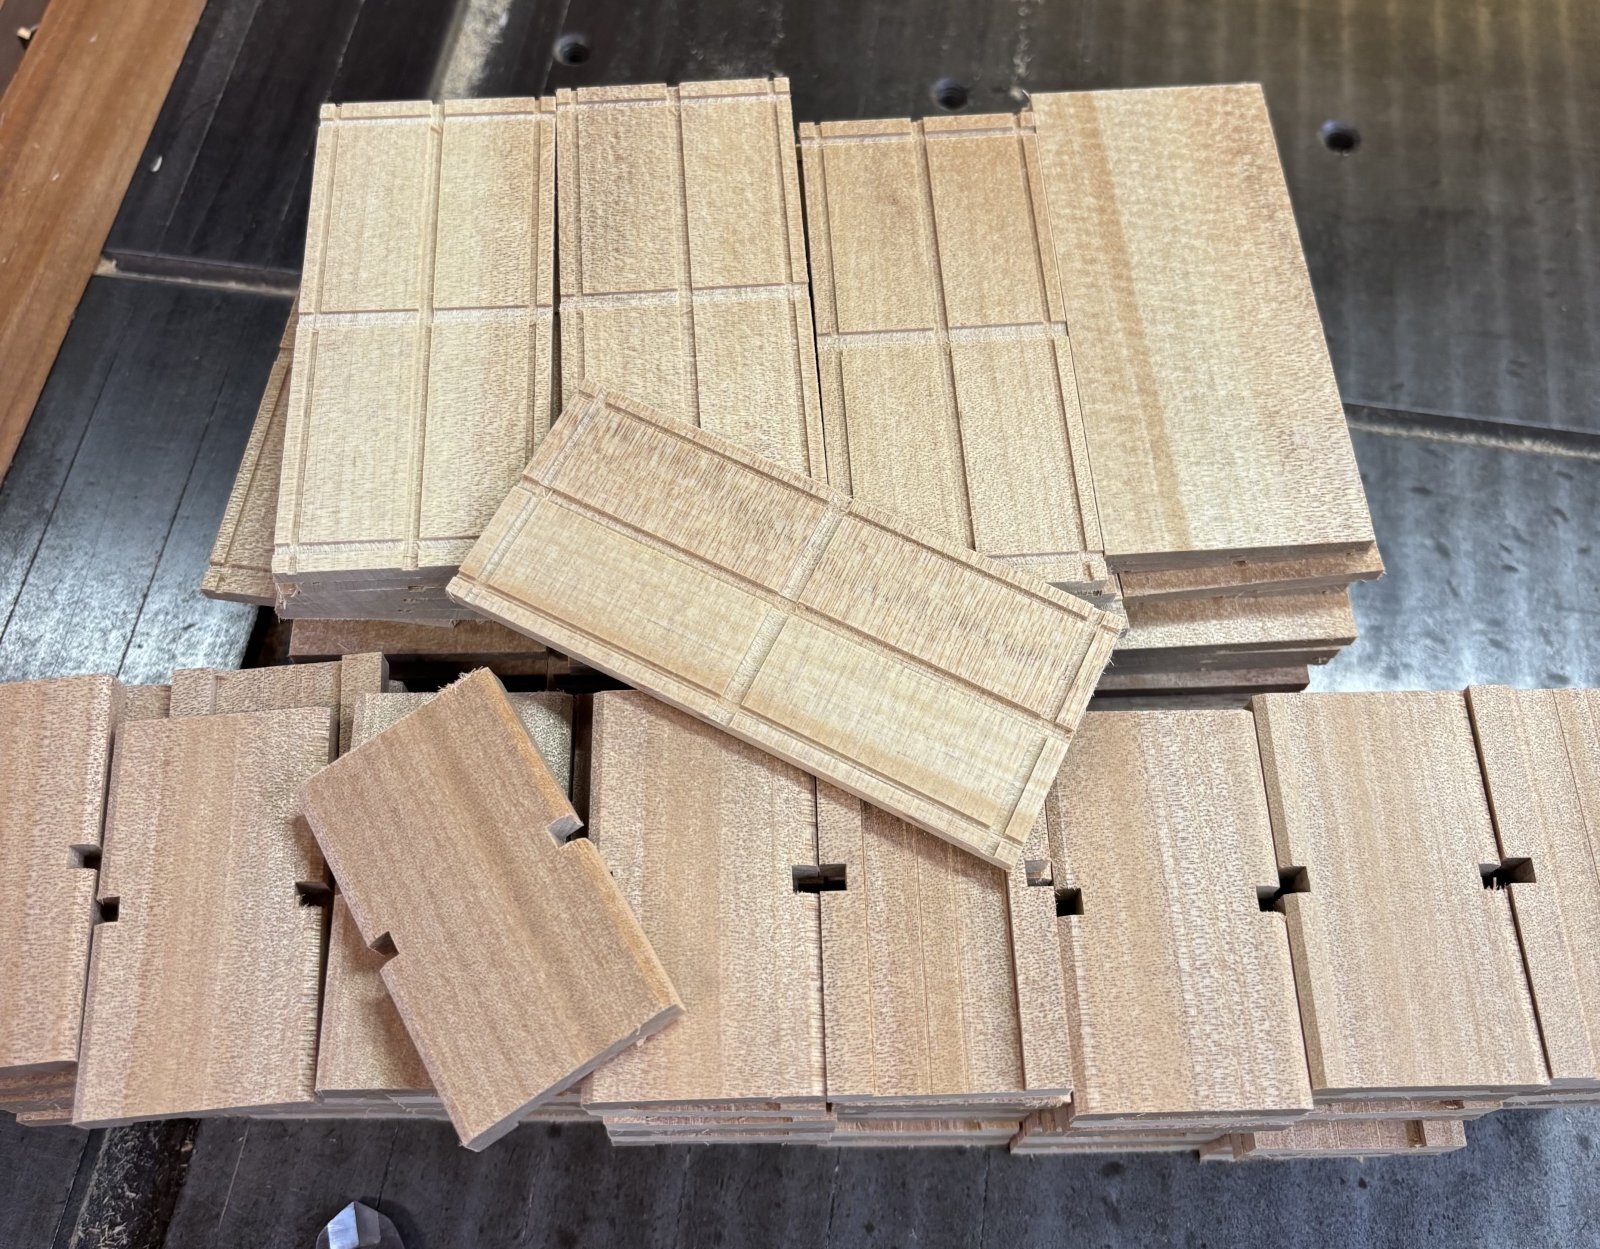
Today I first made the parts for the frame structure. In the photo, you can see the side panels and the axis panels that form part of the internal structure. The most important point was the depth of the notches at the top and bottom of the axis panels. These notches allow the pins attached to the upper Aruki panel to pass through. After passing through the notch, the pins stop when they reach the side panel (the outer Yosegi panel). The pins must pass through the notch smoothly without catching, but if the notch is made too large, it does not look very good. For that reason, it needs to be kept as small as possible while still functioning properly. This box contains one divider that separates the upper and lower sections, and two dividers that separate the left and right sections. I have not made those parts yet, so the next step will be to make them before assembling the frame structure.
This box contains four separate 5-step mechanisms, with the interior divided into four compartments. The mechanisms themselves are not especially difficult, but there are several important points to consider during construction. One of the main structural features is that only two compartments can be opened at a time. When two compartments on the same side are open, the other compartment must still be covered by a lid. This means that when one compartment is opened, the sliding lid panel must move just the right distance to cover the neighboring compartment. Because of this, the dimensions must be calculated very carefully. At the same time, that sliding panel also serves as the lid for one compartment, so it must never come out of the box. To prevent this, a small pin is installed. The pin allows the panel to function as a lid while also preventing it from being removed. The position of the pin must be calculated so that it stops against the opened side panel at exactly the right point. Unfortunately, none of these details were written in my notes. I suspect that I once had a sample box and simply copied the dimensions from it whenever I made another one. At the moment, however, I cannot find that sample. I had originally planned to change the dimensions slightly for this new batch, but I decided to stay as close as possible to the original size. The dimensions were probably carefully worked out for this design, so I felt it would be better not to change them without a good reason. I expected the work to go a little more smoothly, but it looks like I will need to proceed more carefully than I originally thought..haha.
Today I first made the parts for the frame structure. In the photo, you can see the side panels and the axis panels that form part of the internal structure. The most important point was the depth of the notches at the top and bottom of the axis panels. These notches allow the pins attached to the upper Aruki panel to pass through. After passing through the notch, the pins stop when they reach the side panel (the outer Yosegi panel). The pins must pass through the notch smoothly without catching, but if the notch is made too large, it does not look very good. For that reason, it needs to be kept as small as possible while still functioning properly. This box contains one divider that separates the upper and lower sections, and two dividers that separate the left and right sections. I have not made those parts yet, so the next step will be to make them before assembling the frame structure.