Beveling the Axis Panels
The rain that started yesterday is still continuing today, and it looks like we will have this kind of weather throughout the week. In Japan, we often have long periods of rain in autumn, and it seems that the autumn rainy season has already begun. I decided to put off attaching the panels to the 3-sun puzzle boxes, which I had planned to start today, and worked on something else instead. Even though these are small boxes, I think this high humidity could still affect the work. The weather does not look very good for the rest of this week, so I am not sure yet when I will be able to start this work again...
So today, I continued working on the 5-sun 36-step puzzle boxes. First, I prepared the other materials I will need, and then made the long side panels and the axis panels. The long side panels had already been prepared and have been kept clamped in a vise since last week. Today, I worked on them and shaped them to the correct size. I also made the axis panels to match them. As for the other preparation, there are also some parts used inside the box. I checked my stock and found that I still have enough for this batch, so it looks like I will not need to make them this time. These parts are also used for the 27-step puzzle box, so whenever I make them, I usually make a little extra—enough for two or three batches. However, I am a little worried about the largest stair-shaped part. For a 36-step puzzle box, I need twice as many of these as I do for a 27-step box. With the 36-step boxes, I often start thinking I have plenty, but the parts disappear surprisingly quickly, and sometimes I find that I do not have enough halfway through the work.
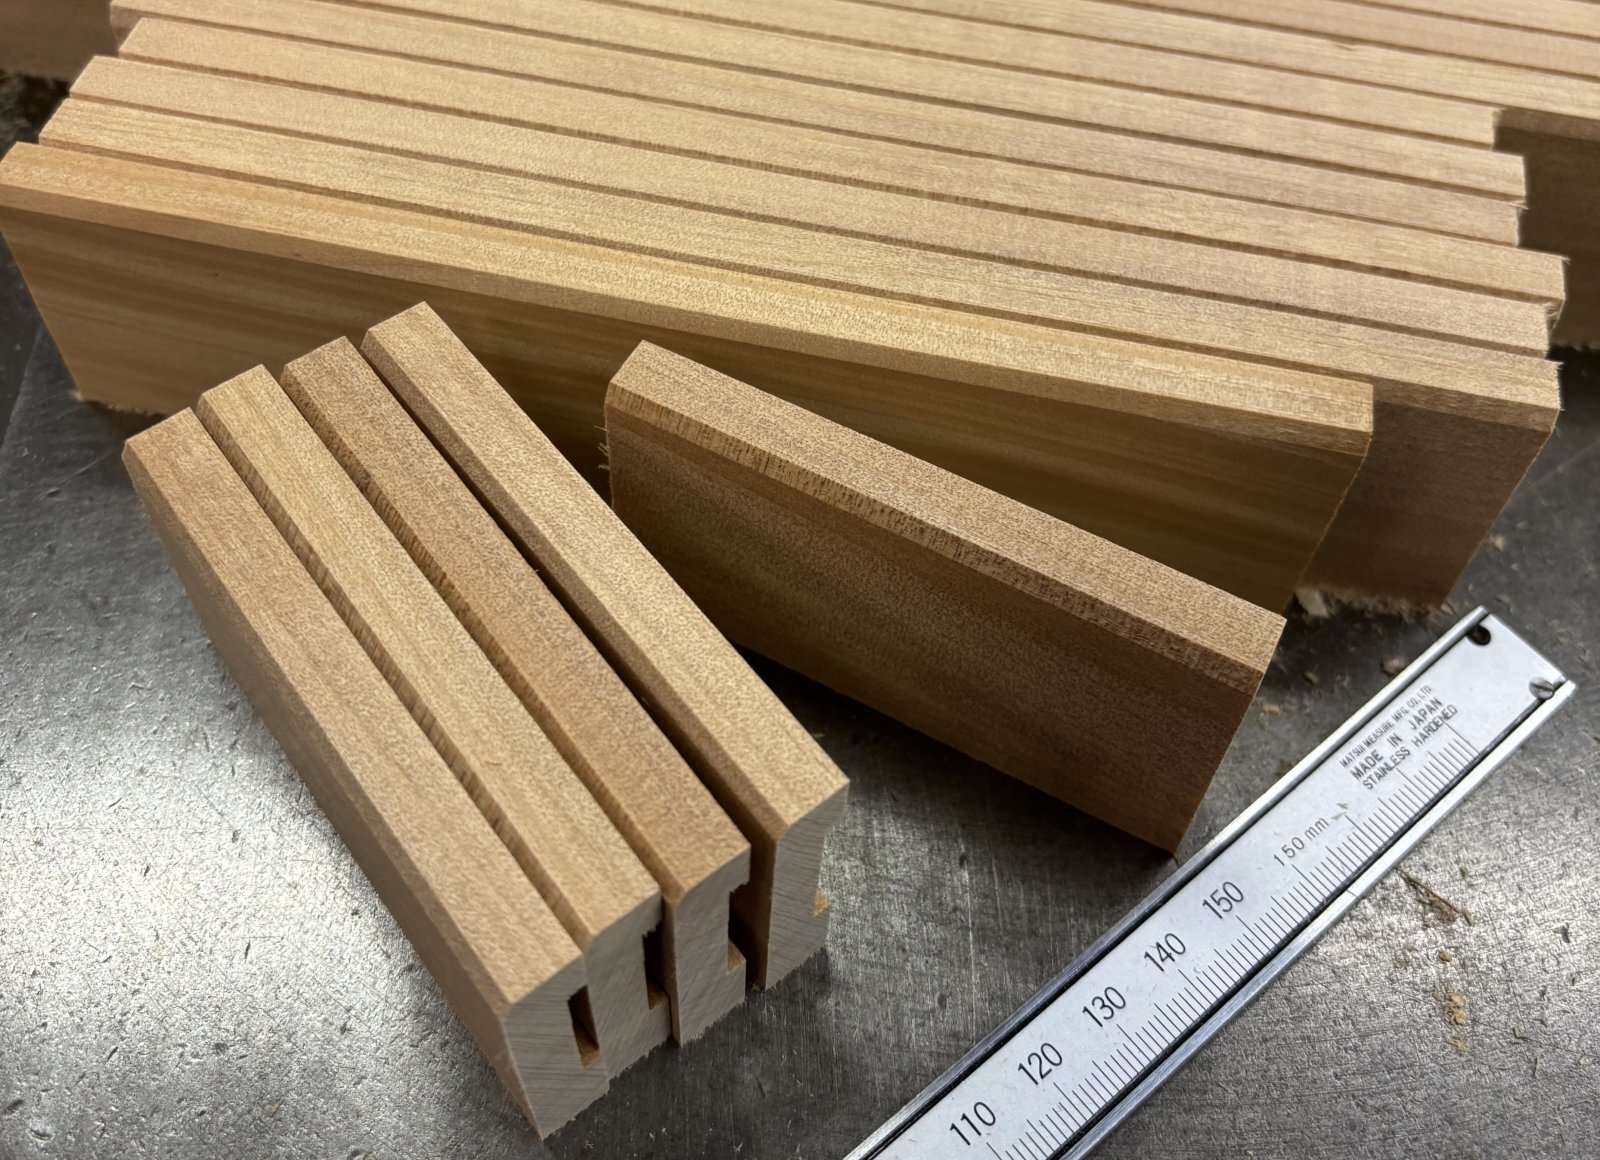
The photo shows the axis panels for these puzzle boxes that I made today. After cutting the grooves on the inside, I am cutting the panels to the correct size. If you have seen the inside of a few Japanese puzzle boxes, you may have noticed that the upper edge on the inside of the axis panel, facing the storage space of the box, is slightly beveled. If you look closely at my photo, you can also see that this edge has been cut at a slight angle. You may wonder why this is done. It has nothing to do with the mechanism. I think it is simply a small decorative detail, and also a little consideration for safety inside the box, so there is no sharp edge.
I am not sure if this can really be called a traditional detail, but on many older puzzle boxes, this part is rounded rather than cut at an angle. The rounded shape does feel a little softer and gentler. Since this detail has nothing to do with the mechanism, some boxes that are made quickly do not have this bevel at all. Perhaps this is more common on lower-priced boxes. It may simply show that the maker is trying to save even this one small step when making the box. As for my own boxes, many years ago I sometimes made this part rounded. More recently, however, I have been cutting it straight at an angle, as you can see in the photo. There are two reasons why I use this shape. The first is the way I work. I can use the same tool that I use to cut the inside of the axis panel, and then continue directly to the next step and cut this edge at an angle. This makes the flow of the work smoother. If I make it rounded, I need to change tools just for this part. It is only a small amount of extra work, but when I make many puzzle boxes every month, these small steps can add up to quite a lot of work. The second reason is simply that I like the shape of the angled cut better. Somehow, the sharper shape gives me the feeling of a puzzle box with a precise, well-made mechanism 😅. Of course, this detail is not necessary at all. But to me, without it, the inside looks a little too simple and somehow feels like something is missing. From a maker’s point of view, it can also feel as though one small finishing step has been left out. So, for now, I continue to make this part with the angled cut you see in the photo.
So today, I continued working on the 5-sun 36-step puzzle boxes. First, I prepared the other materials I will need, and then made the long side panels and the axis panels. The long side panels had already been prepared and have been kept clamped in a vise since last week. Today, I worked on them and shaped them to the correct size. I also made the axis panels to match them. As for the other preparation, there are also some parts used inside the box. I checked my stock and found that I still have enough for this batch, so it looks like I will not need to make them this time. These parts are also used for the 27-step puzzle box, so whenever I make them, I usually make a little extra—enough for two or three batches. However, I am a little worried about the largest stair-shaped part. For a 36-step puzzle box, I need twice as many of these as I do for a 27-step box. With the 36-step boxes, I often start thinking I have plenty, but the parts disappear surprisingly quickly, and sometimes I find that I do not have enough halfway through the work.
The photo shows the axis panels for these puzzle boxes that I made today. After cutting the grooves on the inside, I am cutting the panels to the correct size. If you have seen the inside of a few Japanese puzzle boxes, you may have noticed that the upper edge on the inside of the axis panel, facing the storage space of the box, is slightly beveled. If you look closely at my photo, you can also see that this edge has been cut at a slight angle. You may wonder why this is done. It has nothing to do with the mechanism. I think it is simply a small decorative detail, and also a little consideration for safety inside the box, so there is no sharp edge.
I am not sure if this can really be called a traditional detail, but on many older puzzle boxes, this part is rounded rather than cut at an angle. The rounded shape does feel a little softer and gentler. Since this detail has nothing to do with the mechanism, some boxes that are made quickly do not have this bevel at all. Perhaps this is more common on lower-priced boxes. It may simply show that the maker is trying to save even this one small step when making the box. As for my own boxes, many years ago I sometimes made this part rounded. More recently, however, I have been cutting it straight at an angle, as you can see in the photo. There are two reasons why I use this shape. The first is the way I work. I can use the same tool that I use to cut the inside of the axis panel, and then continue directly to the next step and cut this edge at an angle. This makes the flow of the work smoother. If I make it rounded, I need to change tools just for this part. It is only a small amount of extra work, but when I make many puzzle boxes every month, these small steps can add up to quite a lot of work. The second reason is simply that I like the shape of the angled cut better. Somehow, the sharper shape gives me the feeling of a puzzle box with a precise, well-made mechanism 😅. Of course, this detail is not necessary at all. But to me, without it, the inside looks a little too simple and somehow feels like something is missing. From a maker’s point of view, it can also feel as though one small finishing step has been left out. So, for now, I continue to make this part with the angled cut you see in the photo.