The Difference between the Left and Right panels
Today is the start of a new week and also the last week of this month. Time goes by so fast, and May is already coming to an end as the season slowly moves toward summer. Today became a little warm again. It was sunny from the morning, and the temperature reached around 26°C.
Today, I worked on attaching the sliding key (kannuki) panels for two different types of puzzle boxes: the 4-sun boxes and the 2-sun cube boxes. I spent the whole morning preparing them, and then attached the panels in the afternoon. These two types of boxes use different materials and sizes, so it took a little more time to work on them at the same time. The production process is mostly the same, but the way the fixed side panels are cut is different. The side panels of the 4-sun boxes are made from agathis wood with yosegi sheets attached, while the 2-sun cube boxes use solid walnut wood. For side panels made from solid walnut wood, the fixed side panels must be shaved down completely during this process. In other words, they need to be reduced to exactly the same height as the top and bottom panels. If even a small amount remains, the later sanding work becomes very difficult. On the other hand, for models like these 4-sun boxes with yosegi sheets attached, the small raised part can be sanded away later when the corners of the box are rounded.
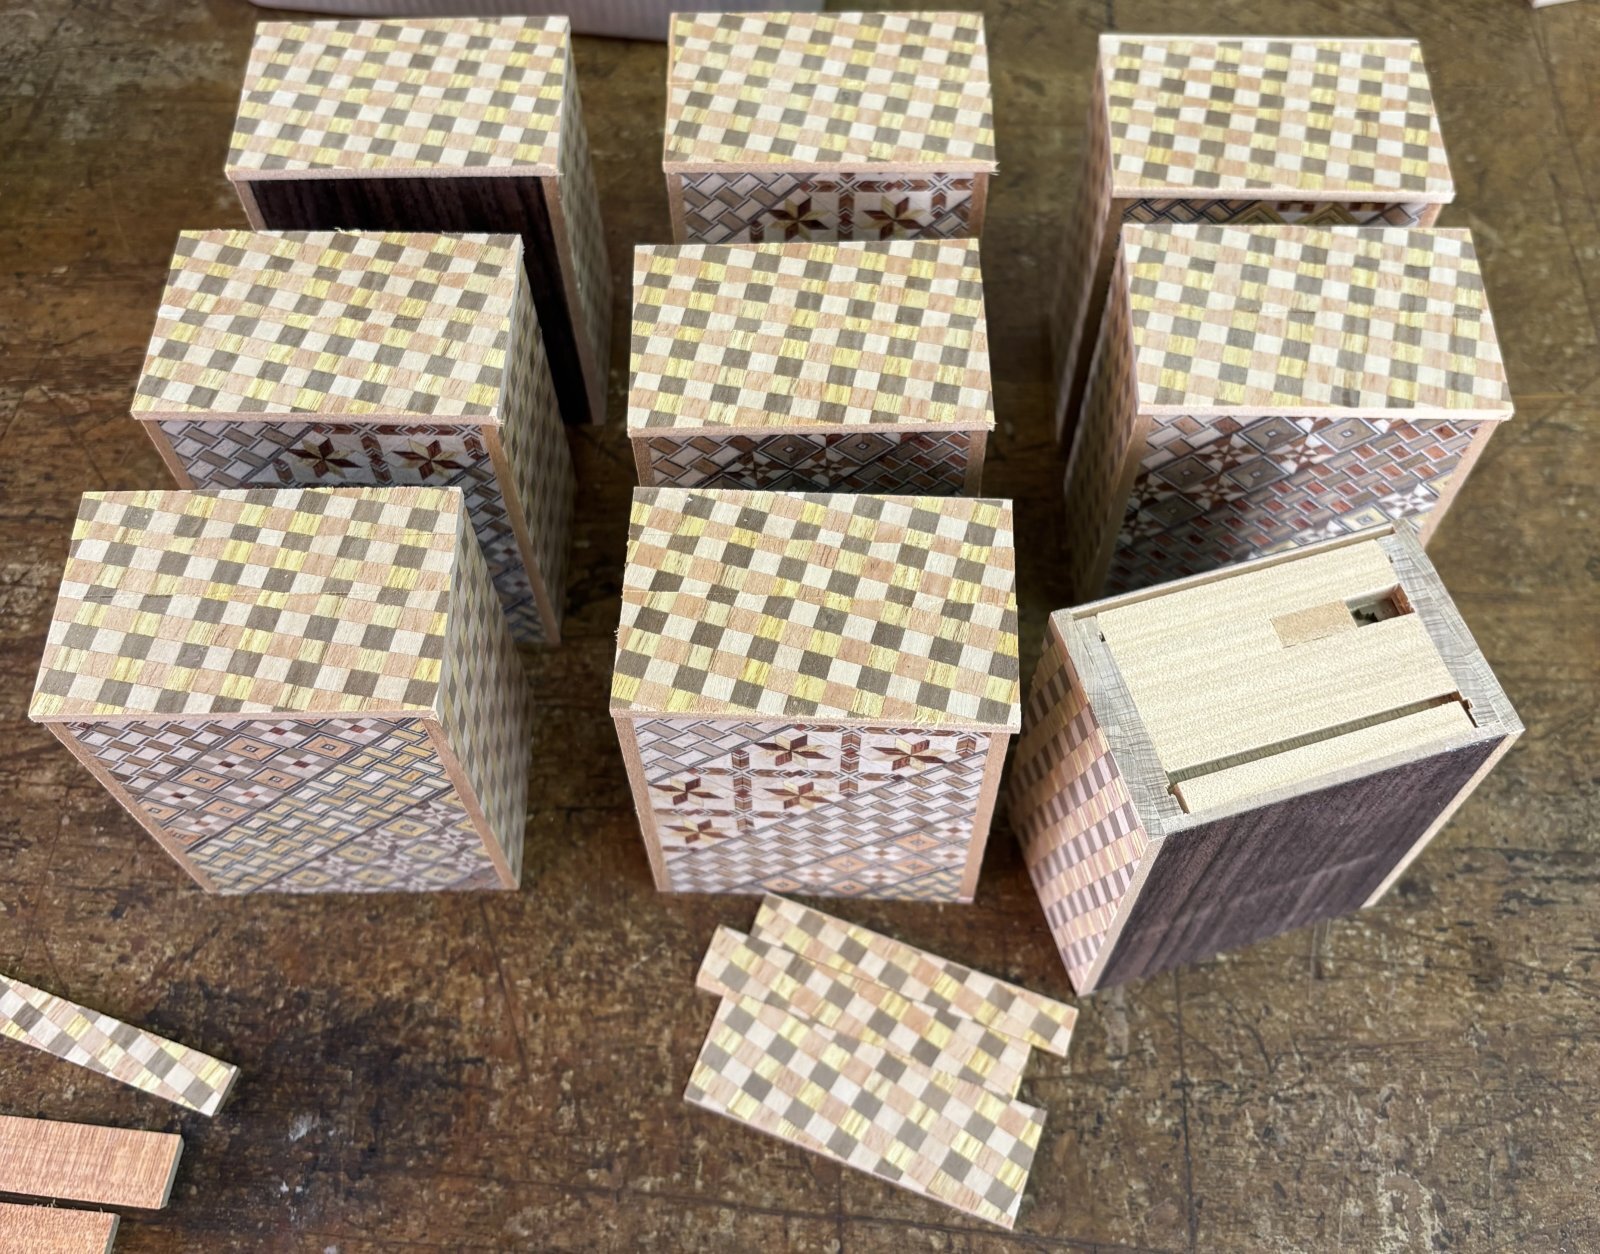
This photo shows the process of attaching the sliding key panels to the 4-sun puzzle boxes. This time, in addition to the traditional yosegi type, I am also making a few rosewood types. I was thinking about which side to attach first, but since tomorrow’s weather also seems fairly good, I decided to attach the side that does not open last first. You may think that either side would be the same, but there is actually a small difference. If you look at the unfinished boxes in the photo, you can see a small horizontal gap near the lower edge of the box. This is the side that moves first. This gap is about 2.3 mm. Because of this, the side that moves first has a slightly smaller gluing area. When deciding which side to attach first, if the weather is very dry and clear, it is better to attach this side first. The reason is that even a small difference in gluing area can make this side more likely to warp. That is why I choose a well-dried day for this work. This time, these are 21-steps puzzle boxes, and among the 4-sun boxes they have a relatively large gluing area, so it is not such a serious issue. However, with 12-step or 4-step puzzle boxes, it has a much bigger effect. This is also one of the causes of panel warping that I mentioned in yesterday’s blog post (did you read it??😁). There is also another important point. Once the sliding key panel is attached to this first-moving side, the bottom panel of the box can no longer be removed. Because of that, the tightness of the bottom panel’s movement must be adjusted carefully before attaching this sliding key panel. Since the bottom panel is a difficult area to move, the key is to adjust it slightly looser.
Today, I worked on attaching the sliding key (kannuki) panels for two different types of puzzle boxes: the 4-sun boxes and the 2-sun cube boxes. I spent the whole morning preparing them, and then attached the panels in the afternoon. These two types of boxes use different materials and sizes, so it took a little more time to work on them at the same time. The production process is mostly the same, but the way the fixed side panels are cut is different. The side panels of the 4-sun boxes are made from agathis wood with yosegi sheets attached, while the 2-sun cube boxes use solid walnut wood. For side panels made from solid walnut wood, the fixed side panels must be shaved down completely during this process. In other words, they need to be reduced to exactly the same height as the top and bottom panels. If even a small amount remains, the later sanding work becomes very difficult. On the other hand, for models like these 4-sun boxes with yosegi sheets attached, the small raised part can be sanded away later when the corners of the box are rounded.
This photo shows the process of attaching the sliding key panels to the 4-sun puzzle boxes. This time, in addition to the traditional yosegi type, I am also making a few rosewood types. I was thinking about which side to attach first, but since tomorrow’s weather also seems fairly good, I decided to attach the side that does not open last first. You may think that either side would be the same, but there is actually a small difference. If you look at the unfinished boxes in the photo, you can see a small horizontal gap near the lower edge of the box. This is the side that moves first. This gap is about 2.3 mm. Because of this, the side that moves first has a slightly smaller gluing area. When deciding which side to attach first, if the weather is very dry and clear, it is better to attach this side first. The reason is that even a small difference in gluing area can make this side more likely to warp. That is why I choose a well-dried day for this work. This time, these are 21-steps puzzle boxes, and among the 4-sun boxes they have a relatively large gluing area, so it is not such a serious issue. However, with 12-step or 4-step puzzle boxes, it has a much bigger effect. This is also one of the causes of panel warping that I mentioned in yesterday’s blog post (did you read it??😁). There is also another important point. Once the sliding key panel is attached to this first-moving side, the bottom panel of the box can no longer be removed. Because of that, the tightness of the bottom panel’s movement must be adjusted carefully before attaching this sliding key panel. Since the bottom panel is a difficult area to move, the key is to adjust it slightly looser.